
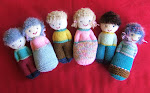
The Ready Teddy Pattern
This little teddy is ready to bring comfort and joy to a child in need. As the teddy should be soft and cuddly please use wool to knit this toy. Use bright colours and make the teddy smile! The teddy is knitted in one piece in garter stitch, except for the head which is knitted in stocking stitch.
Material: 8 ply (DK) wool. three bright colours + black wool for features, poly filling
Finished size: about 33 cm (13 inches) 3.25mm needles
Finished weight: about 100gms
*** Smaller teddy: about 10 inches in size; use 3mm needles and knit 2 rows less on each section
 |
| smaller teddies |
Legs
Cast on 10sts with main colour (head & paws) K10 rows (5 ridges)
Join second colour (pants) K30 rows ending on wrong side. Cut wool leaving 5cm.
Always join new colour wool from right side of work.
Always join new colour wool from right side of work.
 Leaving first leg on needle or working with extra 3.25 mm needle, make second leg. Cast on 10sts with main colour and repeat pattern until matching. Knit across both legs to form body and knit another 15 rows (8 ridges)
 Top
Top
Join in third colour for jumper and knit 24 rows (12 ridges) Join in main colour for head and knit one row. Next row purl. Continue in stocking st until head measures approx. 15 cm (6 inches)
Second half of teddy
Join in jumper colour and knit 24 rows (12 ridges) then join in pants colour and knit 15 rows.
Make legs
Knit first 10sts then turn and knit back. Knit 30 rows for leg. Join in main colour and knit 10 rows for foot. Cast off loosely. Join pants colour to 10sts left on needle and repeat for second leg.

Head
Turn teddy to wrong side and sew side seams of head with back stitch. Weave in end
Ears
Turn teddy to right side and with length of wool same colour as head and wool needle, sew running stitch diagonally at corner of head for ear. Continue thread to back of ear, pull up thread to gather ear and weave in ends. Repeat for other ear.

Arms
From right side, count down six ridges from neck and join in colour of top. Knit up 10 stiches each side including a stitch at seam. (20sts) Knit 20 rows (10 ridges) ending on WS. Join in main colour for paws and knit 8 rows.

Row 9. K2 tog., K7, K2 tog., K7, K2 tog.
Row 10. K2tog., K6, K2tog., K5, K2 tog.
Cast off loosely. This shaping gives a rounded edge to the paws. Repeat for other arm.

Features
Following diagram as a guide, place pins diagonally from the tip of ears. This will give a position for eyes. Mark with pencil dot. From centre position make dot for nose about 1cm (1/2 inch) down the face. Draw line below nose down to curve of mouth. Make a happy face. Do not sew on buttons or plastic eyes as they can be swallowed by small children.


Sewing features in detail
With length of black wool make a knot several cm from end on wrong side. Starting with eye make three small vertical stitches then take wool across to second eye position and repeat. Take needle to nose position centred between eyes and sew first stitch horizontally across one stitch plus a half stitch each side (2 stitches) Sew second stitch across one stitch only and third stitch across half stitch only. Back stitch down to mouth and start curve of one side. Then complete second curve. On wrong side tie beginning thread and end of thread together to secure.
Finishing
Weave in all thread ends on wrong side. Sew in well as these teddies can be subjected to some rough play. (Have road tested on my small grandson) If you have used ‘old’ wool as I often do, you can wash the teddy in fabric softener to make him really soft and cuddly.
When dry, pin teddy together on wrong side matching colours. With wool needle seam with back stitch leaving opening in one inside leg and weave in ends. Turn to right side and fill teddy firmly with poly filling as it will soften with use. Sew up opening.

Neck
With wool needle thread a length of head colour and starting at seam sew running stitch around neck twice. Pull in to make neck and fasten off well by darning into seam. Do not wrap extra wool around neck.
Joints
Sew across top of each leg to create joint and keep filling in place. Sew top of arms down to body to create shoulders and position arms.
Say goodbye to teddy and send him off to his new home. He’s now a ready teddy.
Marion Starr
(Adapted with some modifications from ‘Teddies for Tragedies’)


2 comments:
I will have to try this pattern - the pattern I use is the teddy knitted in 1 piece, then sewn up afterwards.
Hello Taz, This teddy pattern is knitted in one piece also. Just follow the pattern for the details.
Post a Comment